
k3sとprefectで冗長構成のAIワークフロー基盤を構築する
k3sとprefectでAIワークフロー基盤を構築する
概要
PrefectはPythonでワークフローを記述可能なオーケストレーションツールです。 本記事では、軽量Kubernetesであるk3s上にPrefectServerを構築し、冗長構成のワークフロー基盤を構築する方法を紹介します。
環境設計
- コンピューティング: k3s Node (3台)
- OS: Ubuntu Server 24.04 LTS
- CPU: 2CPU
- MEM: 8GB
- ネットワーキング
- k3s Node同士が同一のL2ネットワークで疎通可能な環境
- k3s Nodeがそれぞれインターネットに疎通可能な環境
- k3s NodeがそれぞれIPアドレスを1個ずつ持っていること
- MetalLB用に代表IPアドレスを1個用意すること
- 代表IPアドレスに対してドメインを割り当てること
構成図
Whoamiサービス(接続テスト用)
flowchart TB
    Client["Client<br/>Browser"]
    VIP["代表IP/32<br/>MetalLB VIP"]
    subgraph K3s["K3s Cluster(3 Nodes)"]
        subgraph MetalLB["ns:metallb-system"]
            Pool["IPAddressPool<br/>代表IP/32"]
        end
        subgraph EnvoyGWSystem["ns:envoy-gateway-system"]
            GC["GatewayClass<br/>envoy"]
        end
        subgraph Public["ns:public"]
            Secret["Secret<br/>whoami-tls<br/>tls.crt / tls.key"]
            GW["envoy-gateway<br/>spec.addresses:代表IP"]
            Route["HTTPRoute Host/Path Any<br/>parentRefs: envoy-gateway"]
            SVC["whoami Service"]
            subgraph Pods["DaemonSet"]
                Pod1["whoami Pod1 :80"]
                Pod2["whoami Pod2 :80"]
                Pod3["whoami Pod3 :80"]
            end
        end
    end
    Client -->|"HTTPS :443"| VIP
    Pool -.->|"IP Pool allocation"| EnvoyGWSystem
    Pool -.->|"IP Pool advertisement"| VIP
    VIP -->|"HTTPS :443"| GW
    GC -.->|"gatewayClassName: envoy"| GW
    Secret -.->|"certificateRefs"| GW
    GW -->|"HTTP :80"| Route
    Route -->|"backendRef: svc:80"| SVC
    SVC --> Pod1
    SVC --> Pod2
    SVC --> Pod3
Prefect基盤
flowchart TB
    Client["Client<br/>Browser"]
    VIP["代表IP/32<br/>MetalLB VIP"]
    DNS["DNS"]
    subgraph K3s["K3s Cluster(3 Nodes)"]
        subgraph MetalLB["ns:metallb-system"]
            Pool["IPAddressPool<br/>代表IP/32"]
        end
        subgraph EnvoyGWSystem["ns:envoy-gateway-system"]
            GC["GatewayClass<br/>envoy"]
        end
        subgraph Public["ns:public"]
            Secret["Secret<br/>public-tls<br/>tls.crt / tls.key"]
            GW["envoy-gateway<br/>spec.addresses:代表IP"]
            Route["HTTPRoute<br/>Host: PrefectUIホスト名<br/>Path: Any<br/>parentRefs: envoy-gateway"]
            SVC["Prefect Service"]
            subgraph Pods["ReplicaSet"]
                Pod1["Prefect Server Pod"]
                Pod2["Prefect Worker Pod"]
            end
        end
    end
    Client -->|"HTTPS :443"| VIP
    Pool -.->|"IP Pool allocation"| EnvoyGWSystem
    Pool -.->|"IP Pool advertisement"| VIP
    DNS -.->|"Resolve<br/>prefect.example.local<br/>代表IP"| VIP
    VIP -->|"HTTPS :443"| GW
    GC -.->|"gatewayClassName: envoy"| GW
    Secret -.->|"certificateRefs"| GW
    GW -->|"HTTP :4200"| Route
    Route -->|"backendRef: prefect-server:4200"| SVC
    SVC --> Pod1
    Pod2 -.-> Pod1
環境構築
k3sクラスタの作成
まず、初めに3台のうち適当な1台のサーバでk3sクラスタを作成します。この1台で最初にクラスタを作り、他の2台をクラスタに参加させます。
注意点
- 全部rootで実行します。
- NW環境で10.0.0.0/8,172.16.0.0/12が使用済みであったのでクラスタの内部ネットワークはCIDRを192.168.0.0/16の範囲におさめます。(–cluster-cidr,–service-cidr)
- k3sのLBに今回はmetallbを使うため、デフォルトのlb(servicelb)を無効化(–disable)します。
- k3sのingressに今回はenvoyを使い、gatewayを使用するため、デフォルトのingress(traefik)を無効化(–disable)します。
- 各サーバ筐体に複数のインターフェースがある為、念の為、外部I/Fをeth0に指定しています。(–flannel-iface)
1台目の設定
#!/bin/bash
# encoding: utf-8
openssl rand -hex 32 > /tmp/k3s_token.txt
curl -sfL https://get.k3s.io | K3S_TOKEN=$(cat /tmp/k3s_token.txt) sh -s - server \
    --cluster-init \
    --cluster-cidr=192.168.0.0/17 \
    --service-cidr=192.168.128.0/17 \
    --disable servicelb \
    --disable traefik \
    --flannel-iface="L2ネットワークインターフェース名"
# /tmp/k3s_token.txt の内容はクラスタに参加する際に必要なので、他の2台のサーバにコピーしておきます。
2台目,3台目の設定
#!/bin/bash
# encoding: utf-8
curl -sfL https://get.k3s.io | K3S_TOKEN="1台目で設定したk3s_token.txtの内容" sh -s - server \
    --server https://"1台目のIP":6443 \
    --cluster-cidr=192.168.0.0/17 \
    --service-cidr=192.168.128.0/17 \
    --disable servicelb \
    --disable traefik \
    --flannel-iface="L2ネットワークインターフェース名"
Warning
k3sのアンインストールをするには `/usr/local/bin/k3s-uninstall.sh` を実行します。ただし、ローカルにPersistent Volume (PV)を作っている場合はそれらの手動削除(rm)が必要です。
以後のコマンドは全て1台目のサーバで行います
Helmのインストール
HelmはKubernetesのパッケージマネージャです。 Helmを使うことでKubernetes上にアプリケーションを簡単にデプロイできます。 以下のコマンドでHelmをインストールします。
#!/bin/bash
# encoding: utf-8
curl https://raw.githubusercontent.com/helm/helm/main/scripts/get-helm-4 | bash
MetalLBのインストール
MetalLBはL2ネットワークでKubernetesのLoadBalancerを実現するためのプラグインです。 ActiveなNodeがクラスタの代表IPアドレスを名乗る事により冗長化を実現します。
#!/bin/bash
# encoding: utf-8
helm repo add metallb https://metallb.github.io/metallb
helm repo update
helm pull --untar metallb/metallb
helm upgrade --install metallb ./metallb --namespace metallb-system --create-namespace
MetalLBの設定
MetalLBが代表するIPアドレスプールを設定します。 以下のYAMLファイルを作成し、kubectl apply -fで適用します。
# metallb-envoy-public.yaml
apiVersion: metallb.io/v1beta1
kind: IPAddressPool
metadata:
  name: metallb-public-ip-pool
  namespace: metallb-system
spec:
  addresses:
    - "代表IPアドレス/32"
  serviceAllocation:
    priority: 10
    namespaces:
      - envoy-gateway-system
---
apiVersion: metallb.io/v1beta1
kind: L2Advertisement
metadata:
  name: envoy-gateway-system-public-l2-advertisement
  namespace: metallb-system
spec:
  ipAddressPools:
    - metallb-public-ip-pool
#!/bin/bash
# encoding: utf-8
kubectl apply -f metallb-envoy-public.yaml
これで Namespace が envoy-gateway-system のものに対して MetalLBが代表IPアドレスプールを割り当てるようになります。
Warning
MetalLBが割り当てるのはアドレスプールのみである事に注意してください。実際に割り当てるIPアドレスはGatewayのspec.addressesで指定する必要があります。
Envoy Gatewayのインストール
Envoy GatewayはKubernetes上で動作するL7ロードバランサです。MetalLBのIPアドレスプールを制御してインストールします。
MetalLB側で指定したnamespace(envoy-gateway-system)をここで作成します。
#!/bin/bash
# encoding: utf-8
helm pull --untar oci://docker.io/envoyproxy/gateway-helm --version v0.0.0-latest
helm install envoygateway ./gateway-helm -n envoy-gateway-system --create-namespace --set deployment.replicas=2
Tip
replicas=2 にすることで、片方のPodがダウンしてももう片方のPodが稼働し続けるため、サービスの可用性が向上します。(podAntiAffinityをセットすることでGatewayが2台のk3s Nodeに分散してデプロイされ、1台のNodeがダウンしてももう1台のNodeが稼働し続けるため、さらにサービスの可用性が向上します。)
Gatewayの作成
代表IPアドレスを指定してGatewayを作成します。 代表IPアドレスを利用可能なNamespaceを “public” とします。
# public-envoy-gateway.yaml
apiVersion: v1
kind: Namespace
metadata:
  name: public
---
apiVersion: gateway.networking.k8s.io/v1
kind: GatewayClass
metadata:
  name: envoy
spec:
  controllerName: gateway.envoyproxy.io/gatewayclass-controller
---
apiVersion: gateway.networking.k8s.io/v1
kind: Gateway
metadata:
  name: envoy-gateway
  namespace: public
spec:
  gatewayClassName: envoy
  addresses:
    - type: IPAddress
      value: "代表IPアドレス"
  listeners:
    - name: http
      protocol: HTTP
      port: 80
      allowedRoutes:
        namespaces:
          from: Same
#!/bin/bash
# encoding: utf-8
kubectl apply -f public-envoy-gateway.yaml
テスト用HTTPRouteの作成
代表IPアドレスのGatewayで受けた通信のHTTPRouteを作成します。 whoamiというテスト用サーバーにルーティングするように設定します。
# whoami-http-route.yaml
apiVersion: gateway.networking.k8s.io/v1
kind: HTTPRoute
metadata:
  name: whoami-http-route
  namespace: public
spec:
  parentRefs:
    - name: envoy-gateway
  rules:
    - matches:
        - path:
            type: PathPrefix
            value: /
      backendRefs:
        - name: whoami
          port: 80
#!/bin/bash
# encoding: utf-8
kubectl apply -f whoami-http-route.yaml
テスト用サーバー(DaemonSet)のデプロイ
テスト用サーバーをデプロイします。 whoamiサービスはDaemonSetでデプロイすることで クラスタ内の全てのNodeにwhoami Podが配置され 代表IPアドレスにアクセスした際にどのNodeのPodに ルーティングされるかを確認することができます。
# whoami-daemonset.yaml
apiVersion: v1
kind: Service
metadata:
  name: whoami
  namespace: public
spec:
  type: ClusterIP
  selector:
    app: whoami
  ports:
    - name: http
      port: 80
      targetPort: 80
---
apiVersion: apps/v1
kind: DaemonSet
metadata:
  name: whoami
  namespace: public
spec:
  selector:
    matchLabels:
      app: whoami
  template:
    metadata:
      labels:
        app: whoami
    spec:
      containers:
        - name: whoami
          image: traefik/whoami
          ports:
            - containerPort: 80
#!/bin/bash
# encoding: utf-8
kubectl apply -f whoami-daemonset.yaml
確認
#!/bin/bash
# encoding: utf-8
curl "http://<代表IPアドレス>/"
# 3回ほど実行してwhoamiのPodが3台のNodeに分散していることを確認。
補足: TLS終端(自己署名証明書)
ワイルドカード自己署名証明書の設定
# openssl.cnf
[req]
default_bits = 2048
prompt = no
default_md = sha256
distinguished_name = req_distinguished_name
x509_extensions = v3_ca

[req_distinguished_name]
C = JP
ST = Tokyo
L = Shinjuku
O = MyOrg
OU = MyOrgUnit
CN = *.example.local

[v3_req]
basicConstraints = critical, CA:false
keyUsage = critical, digitalSignature, keyEncipherment
extendedKeyUsage = serverAuth
subjectKeyIdentifier = hash
subjectAltName = @alt_names

[alt_names]
DNS.1 = *.example.local
DNS.2 = example.local
IP.1 = 代表IPアドレス
自己署名証明書の作成とSecretの作成
10年有効な自己署名証明書を作成し、Secretに登録します。
#!/bin/bash
# encoding: utf-8
openssl genrsa -out tls.key 2048
openssl req \
  -x509 \
  -new \
  -key tls.key \
  -sha256 \
  -days 3650 \
  -out tls.crt \
  -config openssl.cnf \
  -extensions v3_req
kubectl create secret tls public-tls \
  -n public \
  --cert=tls.crt \
  --key=tls.key
TLS終端Gatewayの作成
既存のGatewayを編集する形で自己署名証明書によるTLS終端を有効化します。
# public-envoy-gateway.yaml
apiVersion: v1
kind: Namespace
metadata:
  name: public
---
apiVersion: gateway.networking.k8s.io/v1
kind: GatewayClass
metadata:
  name: envoy
spec:
  controllerName: gateway.envoyproxy.io/gatewayclass-controller
---
apiVersion: gateway.networking.k8s.io/v1
kind: Gateway
metadata:
  name: envoy-gateway
  namespace: public
spec:
  gatewayClassName: envoy
  addresses:
    - type: IPAddress
      value: "代表IPアドレス"
  listeners:
    - name: http
      protocol: HTTP
      port: 80
      allowedRoutes:
        namespaces:
          from: Same
    - name: https
      protocol: HTTPS
      port: 443
      tls:
        mode: Terminate
        certificateRefs:
          - kind: Secret
            name: public-tls
CloudNative-PG(PostgreSQL)のインストール
CloudNative-PGはKubernetes上で動作するPostgreSQLのOperatorです。冗長構成のPostgreSQLクラスタを簡単に構築できます。
helm repo add cnpg https://cloudnative-pg.github.io/charts
helm repo update
helm pull --untar cnpg/cloudnative-pg
helm upgrade --install cnpg ./cloudnative-pg --namespace cnpg-system --create-namespace
CloudNative-PGクラスタの設定
今回はPrefect用に64GiBのPersistent Volumeを配置するように設定します。 PodAntiAffinityがprefferedになっているので、最大3台のNode(instance)に分散して配置されます。
# cloudnative-pg.yaml
--- # Create Namespace cnpg
kind: Namespace
apiVersion: v1
metadata:
    name: cnpg-system
--- # Create Secret for Initial Database
apiVersion: v1
data:
  username: ZGVmYXVsdA== # default
  password: ZGVmYXVsdA== # default
kind: Secret
metadata:
  name: default-postgres-secret
  namespace: cnpg-system
type: kubernetes.io/basic-auth
--- # Create Secret for prefect
apiVersion: v1
data:
  username: cHJlZmVjdA== # prefect
  password: cHJlZmVjdA== # prefect
kind: Secret
metadata:
  name: prefect-postgres-secret
  namespace: cnpg-system
type: kubernetes.io/basic-auth
--- # create Cluster and Initial Database and Additional Roles
apiVersion: postgresql.cnpg.io/v1
kind: Cluster
metadata:
  name: cnpgcluster
  namespace: cnpg-system
spec:
  instances: 3
  storage:
    size: 64Gi
  bootstrap:
    initdb:
      database: default
      owner: default
      secret:
        name: default-postgres-secret
  managed:
    roles:
    - name: prefect
      ensure: present
      comment: PrefectServer
      login: true
      passwordSecret:
        name: prefect-postgres-secret
--- # Create prefect Database
apiVersion: postgresql.cnpg.io/v1
kind: Database
metadata:
  name: prefect-db
  namespace: cnpg-system
spec:
  name: prefect
  owner: prefect
  cluster:
    name: cnpgcluster
Prefect Serverのインストール
PrefectServerをインストールします。PrefectServerはPostgreSQLを利用するため、CloudNative-PGで作成したPostgreSQLクラスタの情報をSecretとして渡す必要があります。admin:pass というBasic認証を有効化してPrefectServerをインストールしますが、例ですので実際の運用ではもっと強固なパスワードに変更してください。
helm repo add prefect https://prefecthq.github.io/prefect-helm
helm repo update
helm pull --untar prefect/prefect-server
helm upgrade --install prefect-server ./prefect-server \
  --namespace public \
  --set global.prefect.image.prefectTag=3.8.2-python3.12 \
  --set server.basicAuth.enabled=true \
  --set server.basicAuth.authString="admin:pass" \
  --set server.uiConfig.prefectUiApiUrl="https://prefect.example.local/api" \
  --set secret.create=true \
  --set secret.name="prefect-postgresql-secret" \
  --set secret.username="prefect" \
  --set secret.password="prefect" \
  --set secret.host="cnpgcluster-rw.cnpg-system.svc.cluster.local" \
  --set secret.port="5432" \
  --set secret.database="prefect" \
  --set postgresql.enabled=false \
  --set postgresql.existingSecret="prefect-postgresql-secret"
prefect-serverという名前でServiceが作成されます。
Prefect Server へのアクセス
HTTPRouteの作成
先ほどHelmで自動作成されたServiceへのルーティングを追加します。
# prefect-http-route.yaml
apiVersion: gateway.networking.k8s.io/v1
kind: HTTPRoute
metadata:
  name: prefect-http-route
  namespace: public
spec:
  parentRefs:
    - name: envoy-gateway
  hostnames:
    - "prefect.example.local"
  rules:
    - matches:
        - path:
            type: PathPrefix
            value: /
      backendRefs:
        - name: prefect-server
          port: 4200
#!/bin/bash
# encoding: utf-8
kubectl apply -f prefect-http-route.yaml
Webブラウザ上で自己署名証明書のインストールとログイン
- https://prefect.example.local/api/admin/version にアクセスして自己署名証明書を信頼します。
- https://prefect.example.local/ にアクセスしてPrefect UIが表示されることを確認します。
- ログインパスワードは admin:pass のはずです。
Prefect Workerのインストール
helm repo add prefect https://prefecthq.github.io/prefect-helm
helm repo update
helm pull --untar prefect/prefect-worker
helm upgrade --install prefect-worker ./prefect-worker \
  --namespace public \
  --set worker.apiConfig=selfHostedServer \
  --set worker.config.workPool=work_pool_local_k3s \
  --set worker.selfHostedServerApiConfig.apiUrl=http://prefect-server.public.svc.cluster.local:4200/api \
  --set worker.selfHostedServerApiConfig.basicAuth.enabled=true \
  --set worker.selfHostedServerApiConfig.basicAuth.authString="admin:pass" \
  --set worker.image.prefectTag=3.8.2-python3.12-kubernetes
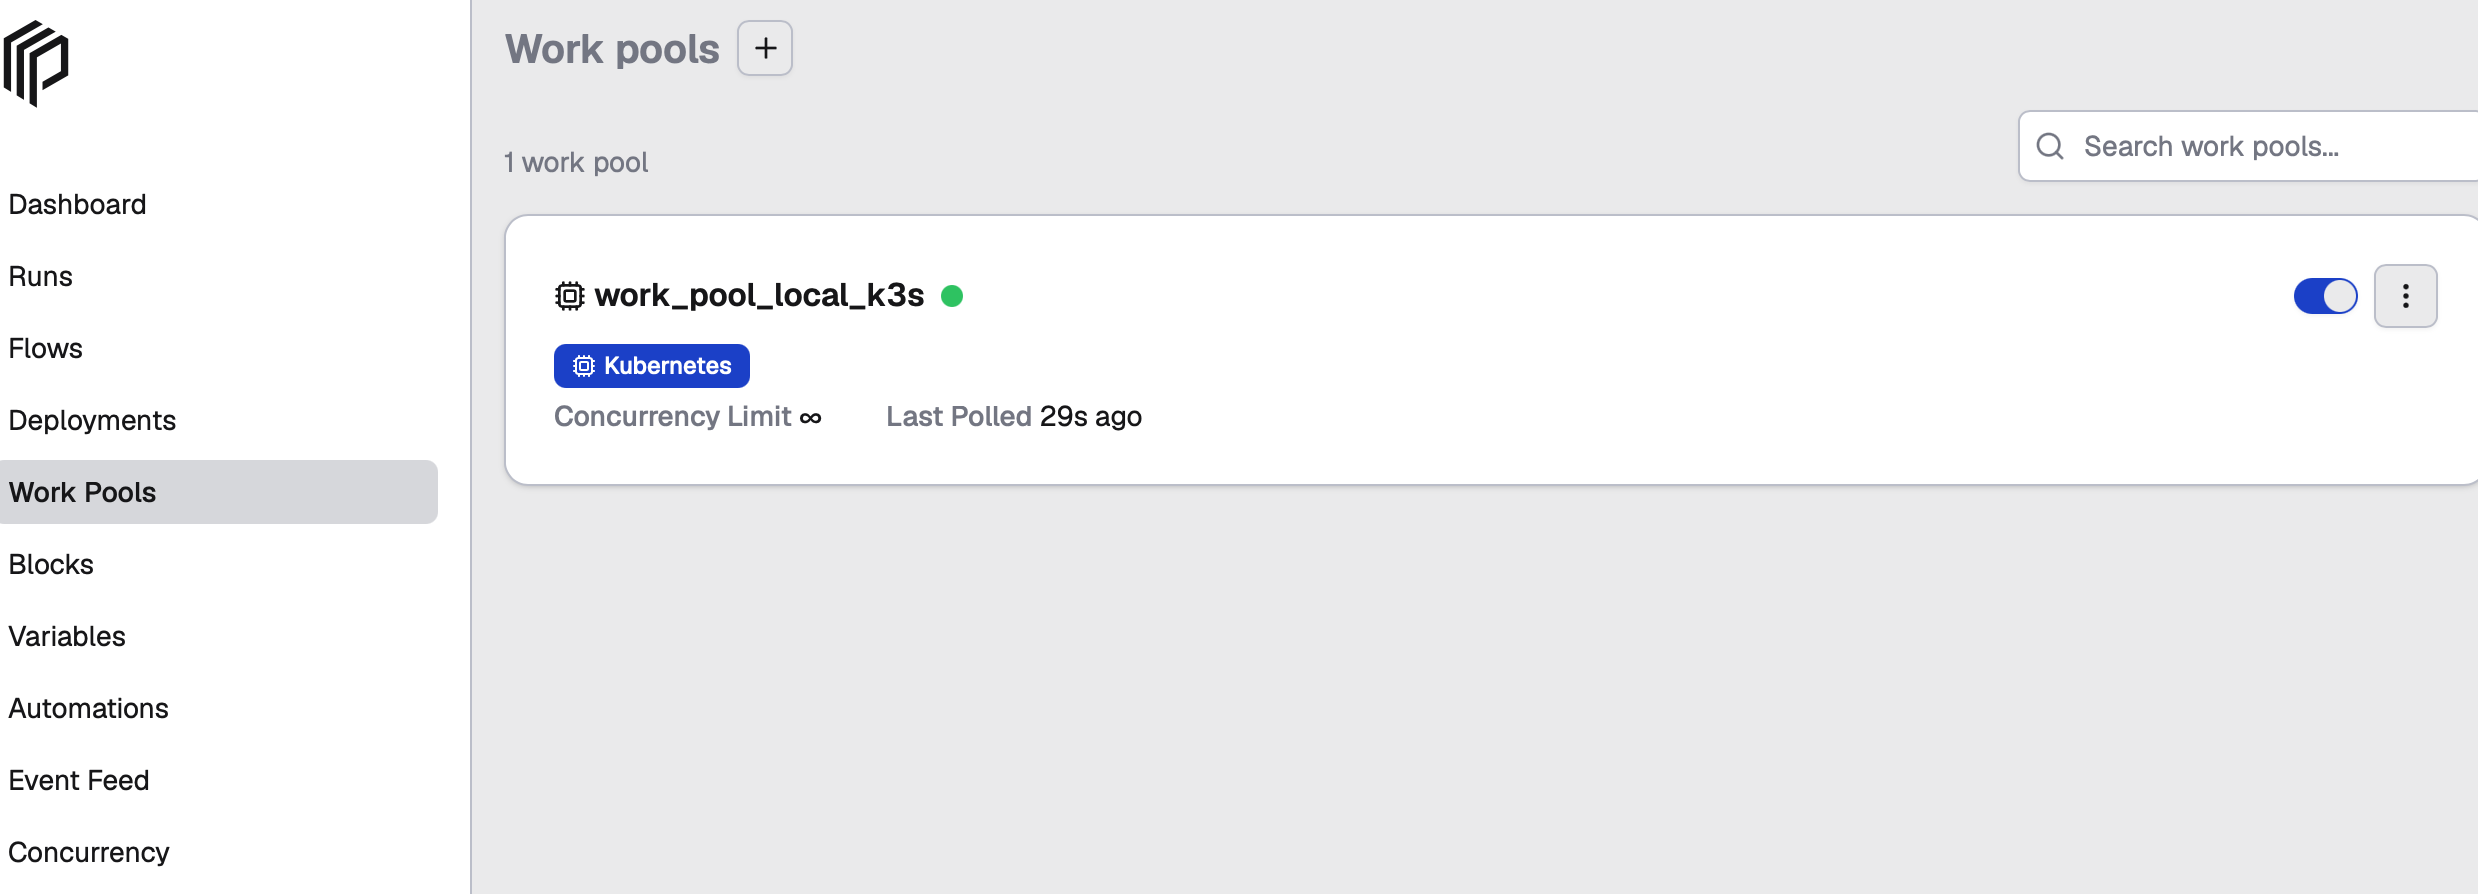
以下のようにWorkPoolが作成され、KubernetesWorkerが登録されます。
Note
KubernetesWorkerはEnvoy経由(つまり、k8sクラスタの外側)からでも登録可能ですが、今回はPrefectServerと同じk3sクラスタ内に配置するため、prefect-server.public.svc.cluster.local:4200/api という内部DNS名でアクセスしています。
Prefectワークフローのテスト実行
確認のため、1台目のサーバからk8sの “外側から” PrefectServerに接続するサンプルスクリプト( hello.py )を作成、実行します。
#!/usr/bin/env python3
# encoding: utf-8

import asyncio

from prefect import flow, get_run_logger, task

@task(log_prints=True)
async def print_log_prints(text: str) -> None:
    print(f"log_prints=True: {text}")

@task
async def log_prefect_run_logger(text: str) -> None:
    logger = get_run_logger()
    logger.info(f"Prefect runtime logger: {text}")

@flow
async def hello_world_flow(text: str) -> None:
    await print_log_prints(text)
    await log_prefect_run_logger(text)

if __name__ == "__main__":
    asyncio.run(hello_world_flow("Hello, Prefect!"))
実行の際に今回構築したPrefect Serverを指定します。 仮想環境はuvを使用します。
mkdir myproj
cd myproj
uv init
# Prefect Server/Workerのバージョンになるべく合わせる
uv add prefect==3.8.2
# Prefect ServerのURLを指定
uv run prefect config set PREFECT_API_URL="https://prefect.example.local/api"
# Prefect ServerのBasic認証を指定
uv run prefect config set PREFECT_API_AUTH_STRING="admin:pass"
# Prefect Serverの自己署名証明書を無視する設定
uv run prefect config set PREFECT_API_TLS_INSECURE_SKIP_VERIFY="true"
uv run hello.py
実行結果、標準出力に以下が生成されます。
06:10:58.650 | INFO    | prefect.engine - View at https://prefect.example.local/runs/flow-run/88ca1546-310b-45f1-ae31-16d64dd135a6
06:10:58.829 | INFO    | Flow run 'sincere-manticore' - Beginning flow run 'sincere-manticore' for flow 'hello-world-flow'
06:10:58.834 | INFO    | Flow run 'sincere-manticore' - View at https://prefect.example.local/runs/flow-run/88ca1546-310b-45f1-ae31-16d64dd135a6
06:10:58.857 | INFO    | Task run 'print_log_prints-458' - log_prints=True: Hello, Prefect!
06:10:58.859 | INFO    | Task run 'print_log_prints-458' - Finished in state Completed()
06:10:58.863 | INFO    | Task run 'log_prefect_run_logger-b30' - Prefect runtime logger: Hello, Prefect!
06:10:58.865 | INFO    | Task run 'log_prefect_run_logger-b30' - Finished in state Completed()
06:10:58.919 | INFO    | Flow run 'sincere-manticore' - Finished in state Completed()
06:10:58.970 | WARNING | EventsWorker - Still processing items: 6 items remaining...
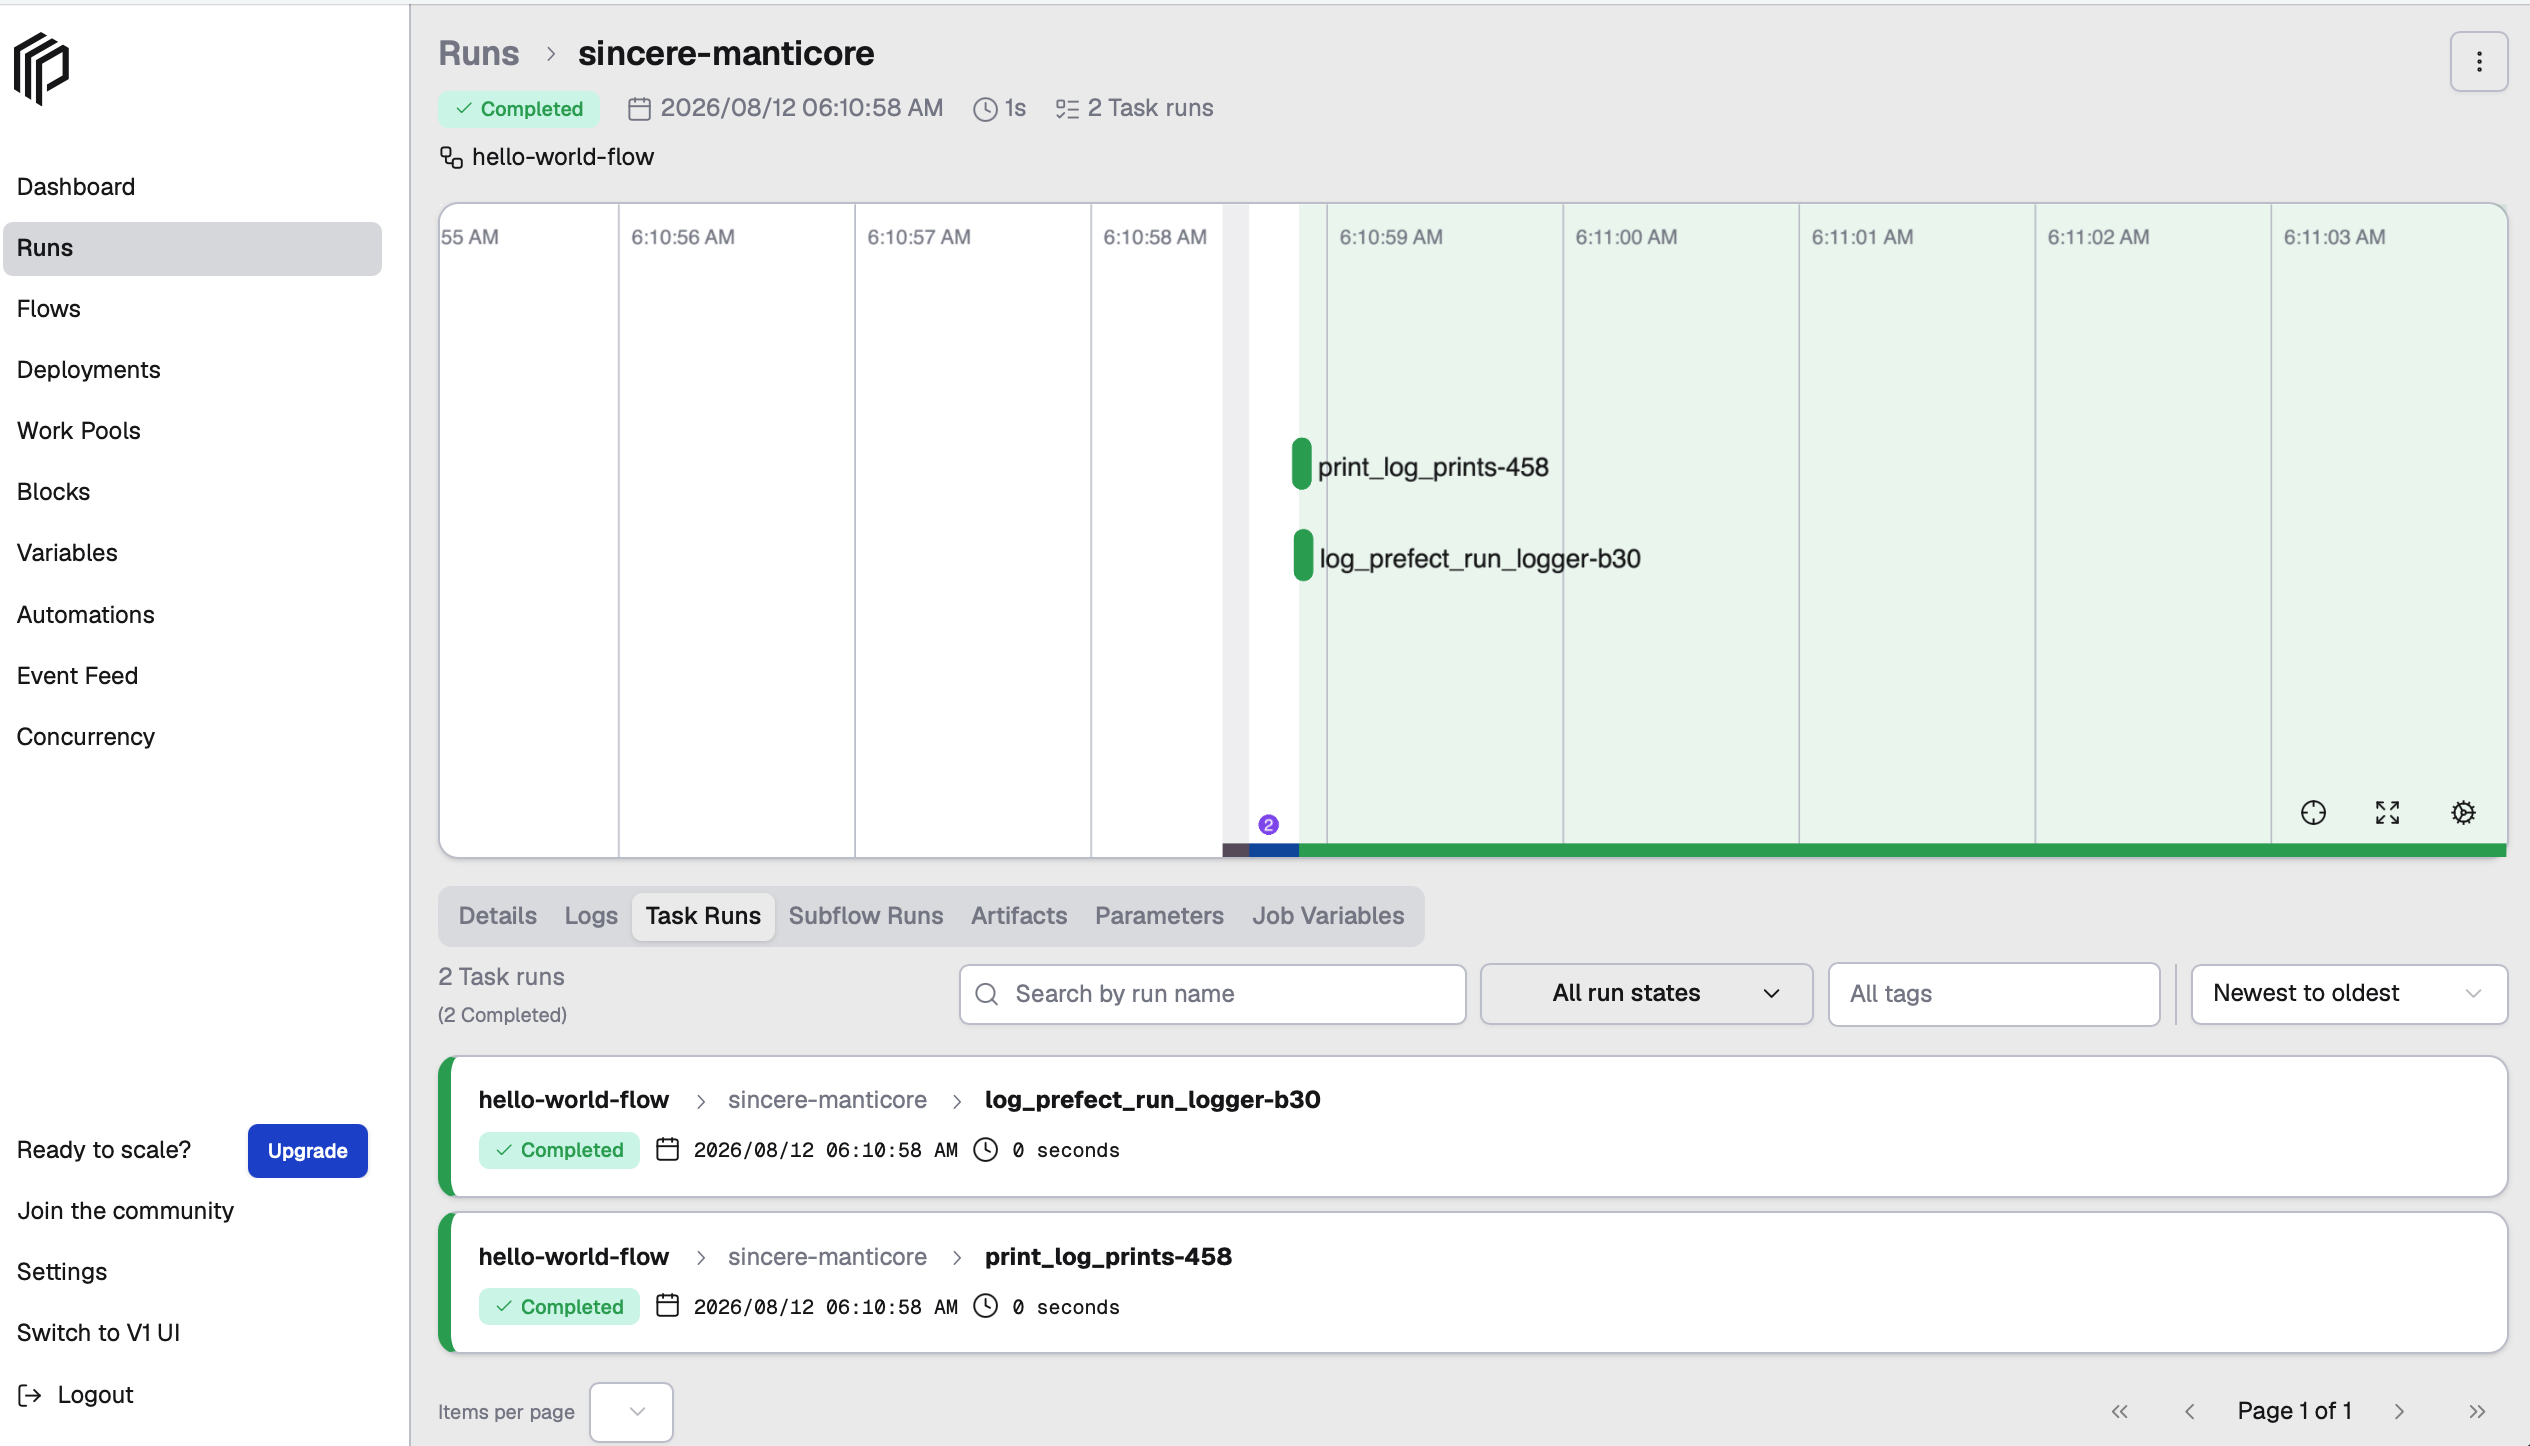
ServerUIから確認すると、以下のようにログが出力されていることが確認できます。(実行時間が短いのでキレイなグラフにはなっていません)
Warning
PrefectライブラリのバージョンはPrefect Server, Prefect Workerと合わせておくとトラブルシューティングが容易です。今回の例ではPrefect 3.8.2を使用しています。
Prefectワークフロー開発環境の構築
Prefectワークフロー開発のキーポイント
PrefectワークフローはPrefectServerに登録されたWorkPoolに所属するPrefectWorkerが動作している実行環境にデプロイされ実行されます。つまり、PrefectServerとPrefectWorkerが疎通していればクラウドやオンプレなど様々な実行環境にPrefectワークフローをデプロイすることが可能です。実行されるワークフローのコードは毎回PrefectServerが外部に参照しに行く構成となります。例えば、コードの管理とコンテナの管理はGithub、実行環境はオンプレk8sやAWSのECS、テスト環境はローカルのDockerコンテナやローカルマシン上のPythonプロセス・・・という形で、ワークフローの構成を複数組み立てることで柔軟なワークフロー開発が可能となります。
Prefect Deployment
PrefectのワークフローはPythonスクリプトとして作成されます。Prefect Deploymentを使用することで、ワークフローをPrefectServerに登録することができます。今回はPrefectWorkerとしてk8s WorkPoolを作成しておりますので、k8sのBatchJobとしてPrefectワークフローを実行することができます。k8sのBatchJobでは、ワークフローの実行環境をコンテナ化し、依存関係の管理やスケーリングが容易になります。
Prefect Variables/Blocks
Prefectのワークフローで使用する変数やシークレットはVariables/BlocksとしてPrefectServerに登録することができます。PrefectワークフローはPrefectServerに問い合わせすることでこれらのVariables/BlocksをPythonスクリプトから参照することが可能になります。
Github Workflows (CI/CD)
今回はCI/CDでGithub上でコード管理、コンテナ管理、シークレット管理を行う為、Github Workflowsを使用します。
- Github Workflowsのワークフローシーケンス
- Developer: コードをpushする開発者
- Github: いわゆるGithubCloud(github.com)
- SelfHostedActionsRunner: 今回構築したPrefectServer及びGithubCloudとの接続性を有するGithubActionsRunner
- GithubContainerRegistry: GithubCloudのPackagesコンテナレジストリ(ghcr.io)
- PrefectServer: 今回構築したPrefectServer(prefect.example.local)
sequenceDiagram
    participant Developer
    participant Github
    participant SelfHostedActionsRunner
    participant GithubContainerRegistry
    participant PrefectServer
    Developer->>Github: Github Secrets/Variables
    Developer->>Github:Push Code Changes
    Github->>SelfHostedActionsRunner:Detect Code Changes
    alt Github CI pipeline
        SelfHostedActionsRunner->>GithubContainerRegistry:Build & Push DockerImage
        Github->>SelfHostedActionsRunner:Github Secrets/Variables
        SelfHostedActionsRunner->>PrefectServer:Update Prefect Blocks/Variables
        SelfHostedActionsRunner->>PrefectServer:Deploy Prefect Workflow
    end
- GithubActionsのそれぞれのWorkflowの役割
# .github/workflows/
entrypoint.yaml: 1. 全体管理
├── docker_build_and_push.yaml: 2. ワークフロー用DockerイメージのBuildとPush
└── deploy_prefect.yaml: 3. ワークフロー用BlocksをGithubSecretsと同期しワークフローをデプロイ
- 必要なGithub Secrets
- PREFECT_API_AUTH_STRING: PrefectServerのBasic認証のユーザ名とパスワードをコロンで連結した文字列(admin:pass)
- 必要なGithub Variables
- PREFECT_API_URL: “https://prefect.example.local/api”
- PREFECT_API_TLS_INSECURE_SKIP_VERIFY: “true”
Workflows
entrypoint.yaml
name: entrypoint
on:
  push: # git push をトリガーにする。
  workflow_dispatch: # git push 以外からの手動実行を可能にする
  workflow_call:
    secrets: # 必要なsecretの指定
      PREFECT_API_AUTH_STRING:
        description: 'PrefectServerのBasic認証のユーザ名とパスワードをコロンで連結した文字列(admin:pass)'
        required: true
jobs:
  # コードベースのPull、DockerイメージのRunner上でのBuild、GithubContainerRegistryへのPush
  docker_build_and_push:
    uses: ./.github/workflows/docker_build_and_push.yaml
    with:
      DOCKER_REGISTRY: ghcr.io
      DOCKER_IMAGE_NAME: ${{ github.repository }}
      DOCKER_USERNAME: ${{ github.actor }}
      DOCKER_WILL_PUSH: ${{ github.event_name != 'pull_request' }} # pull_requestの時はDockerイメージをPushしない
    concurrency: # 親が同時に複数動作しないようにする。
      group: ${{ github.workflow }}-${{ github.ref }}
      cancel-in-progress: true # 後勝ちでWorkflowが実行される
  # PrefectServerにBlocks/Variablesを登録しDeployする
  deploy_prefect:
    needs: [docker_build_and_push]
    uses: ./.github/workflows/deploy_prefect.yaml
    with:
      PREFECT_API_URL: ${{ vars.PREFECT_API_URL }}
      PREFECT_API_TLS_INSECURE_SKIP_VERIFY: ${{ vars.PREFECT_API_TLS_INSECURE_SKIP_VERIFY }}
      DOCKER_REGISTRY: ghcr.io
      DOCKER_IMAGE_NAME: ${{ github.repository }}
    secrets:
      PREFECT_API_AUTH_STRING: ${{ secrets.PREFECT_API_AUTH_STRING }} # PrefectServerにGithubContainerRegistryの認証情報等様々なBlocks/Variablesを登録するのに必要
    concurrency: # 親が同時に複数動作しないようにする。
      group: ${{ github.workflow }}-${{ github.ref }}
      cancel-in-progress: true # 後勝ちでWorkflowが実行される
docker_build_and_push.yaml
name: docker_build_and_push
on:
  workflow_call:
    inputs:
      DOCKER_REGISTRY:
        description: 'Github Container Registry(ghcr.io)'
        required: true
        type: string
      DOCKER_IMAGE_NAME:
        description: 'Github Container Registry Repository Name(github.repository)'
        required: true
        type: string
      DOCKER_USERNAME:
        description: 'Github Container Registry UserName(github.actor)'
        required: true
        type: string
      DOCKER_WILL_PUSH:
        description: 'Whether Should Push Container Image to Registry or NOT'
        required: true
        type: boolean
jobs:
  main:
    runs-on: self-hosted
    defaults:
      run:
        shell: bash
    permissions:
      contents: read # Github Code Repository
      packages: write # Github Container Registry
    steps:
      -
        name: Check out source repository
        uses: actions/checkout@3d3c42e5aac5ba805825da76410c181273ba90b1 # https://github.com/actions/checkout v7.0.1
        with:
          fetch-depth: 1 # shallow clone
      -
        name: Extract metadata (tags, labels) for Docker
        id: meta
        uses: docker/metadata-action@dc802804100637a589fabce1cb79ff13a1411302 # https://github.com/docker/metadata-action v6.2.0
        with:
          images: ${{ inputs.DOCKER_REGISTRY }}/${{ inputs.DOCKER_IMAGE_NAME }}
          tags: |
            # set latest tag for default branch
            type=raw,value=latest,enable={{is_default_branch}}
      -
        name: Login to GitHub Container Registry
        uses: docker/login-action@dbcb813823bdd20940b903addbd779551569679f # https://github.com/docker/login-action v4.6.0
        with:
          registry: ${{ inputs.DOCKER_REGISTRY }}
          username: ${{ inputs.DOCKER_USERNAME }}
          password: ${{ secrets.GITHUB_TOKEN }}
      -
        name: Set up Docker Buildx
        uses: docker/setup-buildx-action@bb05f3f5519dd87d3ba754cc423b652a5edd6d2c # https://github.com/docker/setup-buildx-action v4.2.0
      -
        name: Build and push
        uses: docker/build-push-action@53b7df96c91f9c12dcc8a07bcb9ccacbed38856a # https://github.com/docker/build-push-action v7.3.0
        with:
          context: . # リポジトリ直下のDockerfileを使います。
          push: ${{ inputs.DOCKER_WILL_PUSH }}
          tags: ${{ steps.meta.outputs.tags }}
          labels: ${{ steps.meta.outputs.labels }}
          cache-from: type=registry,ref=${{ inputs.DOCKER_REGISTRY }}/${{ inputs.DOCKER_IMAGE_NAME }}:buildcache
          cache-to: type=registry,ref=${{ inputs.DOCKER_REGISTRY }}/${{ inputs.DOCKER_IMAGE_NAME }}:buildcache,mode=max
deploy_prefect.yaml
name: deploy_prefect
on:
  workflow_call:
    inputs:
      PREFECT_API_URL:
        description: 'API Endpoint for Prefect Server'
        required: true
        type: string
      PREFECT_API_TLS_INSECURE_SKIP_VERIFY:
        description: 'Ignore or not, TLS verification error'
        required: true
        type: string
      DOCKER_REGISTRY:
        description: 'Github Container Registry'
        required: true
        type: string
      DOCKER_IMAGE_NAME:
        description: 'Github Container Registry Repository Name'
        required: true
        type: string
    secrets:
      PREFECT_API_AUTH_STRING:
        description: 'Prefect API Auth String'
        required: true
jobs:
  main:
    runs-on: self-hosted
    defaults:
      run:
        shell: bash
    permissions:
      contents: read # Github Code Repository
    steps:
      -
        name: Check out source repository
        uses: actions/checkout@3d3c42e5aac5ba805825da76410c181273ba90b1 # https://github.com/actions/checkout v7.0.1
        with:
          fetch-depth: 1
      -
        name: Install uv
        uses: astral-sh/setup-uv@20cfd1bf945f4377ade1205e4dbc17946fc9a30d # https://github.com/astral-sh/setup-uv v10.0.1
        with:
          github-token: ${{ secrets.GITHUB_TOKEN }}
      -
        name: Setup Python 3.12
        uses: actions/setup-python@5fda3b95a4ea91299a34e894583c3862153e4b97 # https://github.com/actions/setup-python v7.0.0
        with:
          python-version: '3.12'
      -
        name: Install Prefect
        run: |
          set -x
          uv init
          uv add -r requirements.txt
        # TODO: version pin (uv.lock and sync --frozen)
      -
        name: Login to Prefect Server
        run: |
          uv run prefect config set PREFECT_API_AUTH_STRING=${{ secrets.PREFECT_API_AUTH_STRING }}
          set -x
          uv run prefect config set PREFECT_API_URL=${{ inputs.PREFECT_API_URL }}
          uv run prefect config set PREFECT_API_TLS_INSECURE_SKIP_VERIFY=${{ inputs.PREFECT_API_TLS_INSECURE_SKIP_VERIFY }}
          uv run prefect server status
        # 認証情報は ~/.prefect/profiles.toml に保存されます
      -
        name: Update Prefect Blocks
        run: |
          set -x
          uv run settings.py
        env:
          THIS_IS_SECRET_ENV: SECRETS # {{ secrets.THIS_IS_SECRET_ENV }}
          THIS_IS_VARIABLE_ENV: VARIABLES # {{ inputs.THIS_IS_VARIABLE_ENV }}
      -
        name: Deploy Prefect Workflows
        run: |
          set -x
          uv run prefect deploy --all
        # prefect.yamlに定義されたPrefectワークフローをPrefectServerにデプロイします
        env:
          DOCKER_REGISTRY: ${{ inputs.DOCKER_REGISTRY }}
          DOCKER_IMAGE_NAME: ${{ inputs.DOCKER_IMAGE_NAME }}
Dockerfile
Dockerfileはほぼ定型文です。
# Global Variables
ARG _PYTHON_VERSION=3.12
# Use the official Python image with uv pre-installed
FROM ghcr.io/astral-sh/uv:python${_PYTHON_VERSION}-bookworm-slim
# Set the working directory
WORKDIR /opt/prefect/
# Set environment variables
ENV UV_SYSTEM_PYTHON=1
ENV PYTHONUNBUFFERED=1
ENV PATH="/root/.local/bin:$PATH"
# Copy only the requirements file first to leverage Docker cache
COPY requirements.txt .
# Install dependencies
RUN --mount=type=cache,target=/root/.cache/uv \
    uv pip install -r requirements.txt
# Copy the rest of the application code
COPY . /opt/prefect/
Prefectワークフローで使うPythonライブラリはrequirements.txtで管理します。
settings.py
settings.pyもほぼ定型文です。本来はリポジトリのSecretsにTHIS_IS_SECRET_ENVとTHIS_IS_VARIABLE_ENVをそれぞれ登録し
deploy_prefect.yamlでそれらの値を環境変数として渡すことでGithubSecrets/VariablesをPrefect Blocks/Variablesを同期することができます。
#!/usr/bin/env python
# encoding: utf-8
import os
import asyncio

from prefect import flow, task
from prefect.blocks.system import Secret
from prefect.variables import Variable


@task(log_prints=True)
async def set_blocks() -> None:
    THIS_IS_SECRET_ENV = os.environ["THIS_IS_SECRET_ENV"]
    async with asyncio.TaskGroup() as t:
        t.create_task(
            Secret(value=THIS_IS_SECRET_ENV).save(name="this-is-secret-block", overwrite=True)
        )


@task(log_prints=True)
async def set_variables() -> None:
    THIS_IS_VARIABLE_ENV = os.environ["THIS_IS_VARIABLE_ENV"]
    async with asyncio.TaskGroup() as t:
        t.create_task(
            Variable.set(name="this-is-variable", value=THIS_IS_VARIABLE_ENV, tags=["test",], overwrite=True)
        )

@flow
async def setup() -> None:
    async with asyncio.TaskGroup() as t:
        t.create_task(set_blocks())
        t.create_task(set_variables())


if __name__ == "__main__":
    asyncio.run(setup())
prefect.yaml
GithubContainerRegistry imagePullSecrets
prefect.yamlを記述する前に、当該リポジトリにおけるGithubContainerRegistry(Packages)へのRead権限を保有したPAT(classic)を取得しておきます。
これは、PrefectWorker(k8s job)がGithubContainerRegistryからDockerイメージをPullするのに必要です。
それをk8sのSecretとして登録します。ここでは一旦Secret名をprefect-ghcr-secretとします。
kubectl create secret docker-registry prefect-ghcr-secret \
  --namespace public \
  --docker-server=ghcr.io \
  --docker-username="GITHUB_PATの発行元ユーザ名" \
  --docker-password="GITHUB_PAT値"
作成したSecretをimagePullSecretsに指定したServiceAccountを作成します。ここでは一旦SA名をprefect-service-accountとします。
# prefect-service-account.yaml
apiVersion: v1
kind: ServiceAccount
metadata:
  name: prefect-service-account
  namespace: public
imagePullSecrets:
- name: prefect-ghcr-secret
applyします。
kubectl apply -f prefect-service-account.yaml
このSAはPrefect deploymentsのjob_variablesでservice_account_nameとして指定します。
prefect.yamlの内容
ほぼprefect initで出力される内容と同じです。
# Welcome to your prefect.yaml file! You can use this file for storing and managing
# configuration for deploying your flows. We recommend committing this file to source
# control along with your flow code.

# Generic metadata about this project
name: "dev"
prefect-version: "3.8.2"

# build section allows you to manage and build docker images
build: null

# push section allows you to manage if and how this project is uploaded to remote locations
push: null

# pull section allows you to provide instructions for cloning this project in remote locations
pull:
- prefect.deployments.steps.set_working_directory:
    directory: "/opt/prefect"

# Pointers to the work pools that this project will use for deployments
work_pool_local_k3s: &work_pool_local_k3s
  name: "work_pool_local_k3s"
  job_variables:
    image: "{{ $DOCKER_REGISTRY }}/{{ $DOCKER_IMAGE_NAME }}:latest"
    namespace: "public"
    service_account_name: "prefect-service-account"
    image_pull_policy: "Always"
    finished_job_ttl: 30

deployments:
- name: "hello_world"
  flow_name: "flow_hello_world"
  entrypoint: "flows/hello_world.py:hello_world"
  description: "Hello World"
  tags:
    - "misc"
  work_pool:
    <<: *work_pool_local_k3s
- name: "hello_secret_variables"
  flow_name: "flow_hello_secret_variables"
  entrypoint: "flows/hello_secret_variables.py:hello_secret_variables"
  description: "Hello World with Prefect Variables and Blocks"
  tags:
    - "misc"
  work_pool:
    <<: *work_pool_local_k3s
flows/hello_world.py
#!/usr/bin/env python3
# encoding: utf-8

import asyncio

from prefect import flow, get_run_logger, task

@task(log_prints=True)
async def print_log_prints(text: str) -> None:
    print(f"log_prints=True: {text}")

@task
async def log_prefect_run_logger(text: str) -> None:
    logger = get_run_logger()
    logger.info(f"Prefect runtime logger: {text}")

@flow
async def hello_world(text: str = "Hello Prefect!") -> None:
    await print_log_prints(text)
    await log_prefect_run_logger(text)

if __name__ == "__main__":
    asyncio.run(hello_world("Hello, Prefect!"))
flows/hello_secret_variables.py
#!/usr/bin/env python3
# encoding: utf-8

import asyncio

from prefect import flow, get_run_logger, task
from prefect.blocks.system import Secret
from prefect.variables import Variable

@task(log_prints=True)
async def print_log_prints() -> None:
    v = await Variable.get("this-is-variable")
    print(f"log_prints=True: {v}")

@task
async def log_prefect_run_logger() -> None:
    logger = get_run_logger()
    s = (await Secret.load("this-is-secret-block")).get()
    logger.info(f"Prefect runtime logger: {s}")

@flow
async def hello_secret_variables() -> None:
    await print_log_prints()
    await log_prefect_run_logger()

if __name__ == "__main__":
    asyncio.run(hello_secret_variables())